Clay Masking
 Clay masks are a simple and gentle way to deep clean and exfoliate the skin. Clay masking has been a mixed experience for many clients as it can be messy and when done incorrectly, it can be extremely irritating. I would like to give you a few pointers on how to clay mask successfully.
For a full clay mask treatment;
Step 1 – Mix your clay mask: You can mix it with just water, or toner, or to make it creamier, add a little Soothing Cleansing Milk. This helps the clay mask to stay moist longer and makes it easier to remove. We even mix in a little Rose Day Cream if we feel a clients needs an extra gentle mask; it does not interfere with the cleansing process.
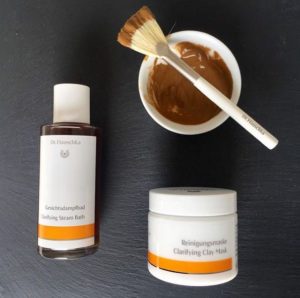
Step 2 – Steam your face: You can steam with plain water, or ideally, add some Clarifying Steam Bath to the water for a deeper clean. Clarifying Steam Bath reduces redness, reduces the appearance of enlarged pores and prepares the skin for the clay mask. Pour steaming hot water and two tablespoons of Clarifying Steam Bath into a bowl and lean over the bowl with a towel over your head. Steam for 3-10 minutes, 3-5 if your skin is more sensitive or dry and 5-10 if your skin is thicker and oilier.
Step 3 – Apply the clay mask and leave it on for as long as you steamed your face. You can apply it with your fingers, but it is less messy if done with a brush. A clay mask does not have to be thick, a thin layer is just fine. If it starts to dry out, take a moist wash cloth and press it gently to the face. You can allow the clay mask to completely dry out if it is your preference, however this is not necessary for the mask to work and can make it irritating. When removing the mask, make sure it is well moistened first so that it can be removed more gently.
For a quick and easy treatment;
If you want to add Clarifying Clay Mask to your regime and don’t have time for a full treatment, you can apply it after a shower. Alternately you can mix it with the Soothing Cleansing Milk a few times a week when cleansing. I will apply the mixture and leave it on for a few minutes before rinsing my face and often do this in the shower.
There are many types of clay available for masking; french green clay is popular and a more gentle clay, bentonite clay is good for oilier, heartier faces, and red clay is popular for its high mineral content.
What I find particularly lovely about Dr. Hauschka’s Clarifying Clay Mask is how gentle it is while still being effective at deep cleaning and exfoliating. It is made from a type of clay called loess, which is essentially a very fine wind blown silt. It contains essential minerals which strengthen the skin while imparting a youthful radiance. They also ad nasturtium and witch hazel extracts which have antimicrobial and soothing qualities. Patty and I have talked about how we often wish we could hand our clients a mirror to look at their skin after we remove the clay mask just to see how calm, radiant and evenly toned it looks. Except at this point in the facial, our clients are so relaxed we wouldn’t want to bother them to do anything at all!
I hope these tips have been helpful. If you ever have questions about using any of the Dr. Hauschka products, or want to schedule a consult or treatment for your skin, contact us via email at info@jasminevt.com or call us at 802-257-0333.